Slim Down Your Email Optin with Our Tutorial and Free Custom Module
Bigger Doesn’t Mean Better
Our slim email optin module consists of carefully selected elements. Short text asking your visitors to subscribe is followed by an email address box with a subtle icon, and a CTA button which stands out thanks to a beautiful gradient. It’s simple and unobtrusive, yet inviting – and so easy to fill in!
What are you waiting for? Slim down your optin module and watch your subscription rate rise!
Please note: To use this custom module, you need to have the Divi theme and the Bloom plugin from Elegant Themes installed.
If you aren’t our subscriber yet, enter your email address below to download the custom slim email optin module for Divi. Our subscribers regularly receive free layouts, custom modules and plugins, and special product offers which you can’t miss!
Download, install and configure the Bloom plugin
The Bloom plugin requires an account on one of the most popular email marketing platforms. After the plugin is installed, we need to select the platform we are going to use and add the username and the API key. The integration is seamless. Bloom provides integration with most of the email marketing platforms such as MailChimp, Aweber, Campaign Monitor, GetResponse and more.
Add new optin
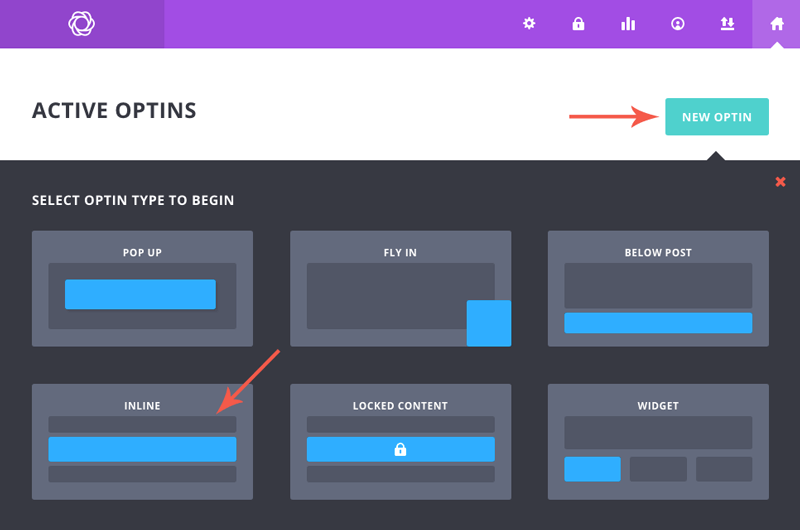
Once we add and authorize our email marketing account to the Bloom plugin, we can add a new email optin form. For this tutorial, we used an inline form. To do that, go to Bloom → Optin Forms, click Add New, and select Inline form.
Configure the optin form
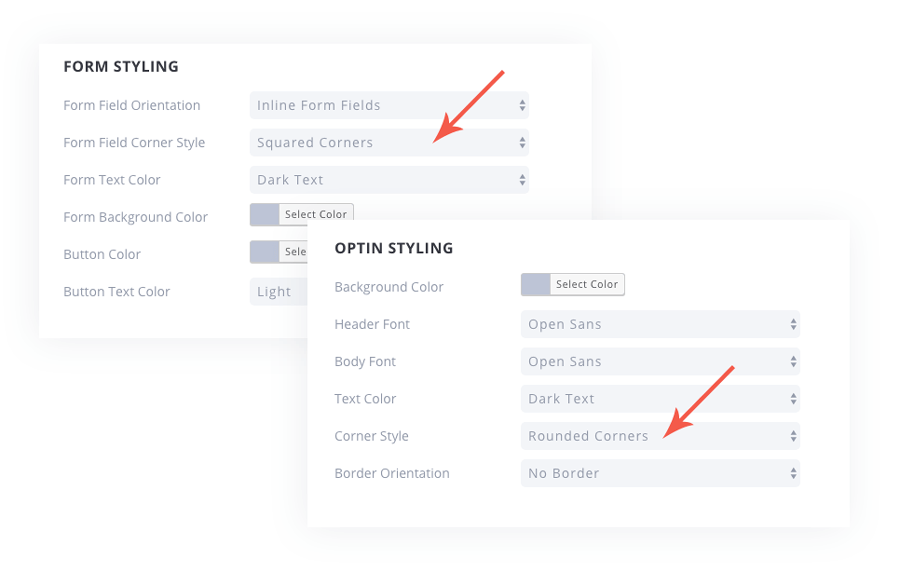
In this step, we need to select the proper settings that will make our custom CSS, which we are going to add in next steps, work correctly. The following two options here are crucial. We need to make sure that Form Field Corner Style in Form Styling section is set to Squared Corners (yes… even if we are planning to do Rounded Corners, this option must be set to squared, otherwise our custom CSS won’t work). The second option we need to set is Corner Style in Optin Styling section, and it must be set to Rounded Corners (see image below). Save form!
Add custom CSS
Before we add our new form to the page, we need to add custom CSS. This code will make our email field rounded, add email icon, and also apply gradient to the button. This gradient can be edited by adding our own code. For this tutorial I have used gradient generator.
Add the following custom CSS to Divi→ Theme Options→ Custom CSS:
|
1 2 3 4 5 6 7 8 9 10 11 12 13 14 15 16 17 18 19 20 21 22 23 24 25 26 27 28 29 30 31 32 33 34 35 36 37 38 39 40 41 |
/* Sign Up Form */ .fc_signup .et_bloom_inline_form {margin:0 !important;} .fc_signup .et_bloom_header_outer {display:none;} .fc_signup .et_bloom_form_container .et_bloom_form_content {padding: 5px !important; background-color: #fff !important;} .fc_signup .et_bloom_form_bottom.et_bloom_rounded_corners .et_bloom_form_content {border-radius: 100px !important; box-shadow: 0 10px 40px #34007515 !important;} .fc_signup .et_bloom_form_container {border-radius: 100px !important;} .fc_signup .et_bloom_form_container {background-color: #fff !important;} .fc_signup .et_bloom_form_container .et_bloom_form_content .et_bloom_popup_input {padding: 10px 20px !important; display: inline-flex;} .fc_signup .et_bloom_form_content button {padding: 20px !important;} .fc_signup .et_bloom_form_content button {border-radius: 100px; box-shadow: 0 2px 8px #34007525 !important; background: #00a191; /* Old browsers */ background: -moz-linear-gradient(left, #00a191 0%, #00cf82 100%) !important; /* FF3.6-15 */ background: -webkit-linear-gradient(left, #00a191 0%,#00cf82 100%) !important; /* Chrome10-25,Safari5.1-6 */ background: linear-gradient(to right, #00a191 0%,#00cf82 100%) !important; /* W3C, IE10+, FF16+, Chrome26+, Opera12+, Safari7+ */ filter: progid:DXImageTransform.Microsoft.gradient( startColorstr='#00a191', endColorstr='#00cf82',GradientType=1 );} /* IE6-9 */ .fc_signup .et_bloom_form_container form input {font-family: 'Montserrat',Helvetica,Arial,Lucida,sans-serif !important;} .fc_signup .et_bloom_subscribe_email::before {content: "\\\\e076"!important;font-family: "ETmodules"!important;line-height: 38px;color: #e0e0e4;} /* END */ /* fc signup mobile */ .fc_signup_mobile .et_bloom_inline_form {margin:0 !important;} .fc_signup_mobile .et_bloom_header_outer {display:none;} .fc_signup_mobile .et_bloom_form_container .et_bloom_form_content {background-color: #00000000 !important;} .fc_signup_mobile .et_bloom_form_container {background: none !important;} .fc_signup_mobile .et_bloom_form_container .et_bloom_form_content .et_bloom_popup_input {padding: 10px 20px!important;display: inline-flex;background: #fff;border-radius: 100px;margin-bottom: 15px;} .fc_signup_mobile .et_bloom_form_content button {padding: 20px !important;} .fc_signup_mobile .et_bloom_form_content button {border-radius: 100px; box-shadow: 0 2px 8px #34007525 !important; background: #00a191; /* Old browsers */ background: -moz-linear-gradient(left, #00a191 0%, #00cf82 100%) !important; /* FF3.6-15 */ background: -webkit-linear-gradient(left, #00a191 0%,#00cf82 100%) !important; /* Chrome10-25,Safari5.1-6 */ background: linear-gradient(to right, #00a191 0%,#00cf82 100%) !important; /* W3C, IE10+, FF16+, Chrome26+, Opera12+, Safari7+ */ filter: progid:DXImageTransform.Microsoft.gradient( startColorstr='#00a191', endColorstr='#00cf82',GradientType=1 );} /* IE6-9 */ .fc_signup_mobile .et_bloom_form_container form input {font-family: 'Montserrat',Helvetica,Arial,Lucida,sans-serif !important;} .fc_signup_mobile .et_bloom_subscribe_email::before {content: "\\\\e076"!important;font-family: "ETmodules"!important;line-height: 38px;color: #e0e0e4;} @media (min-width: 640px) and (max-width: 768px) { .fc_signup_mobile .et_bloom_form_container .et_bloom_form_content .et_bloom_fields { background: white; border-radius: 100px; } } |
Import Divi sections to the Divi Library
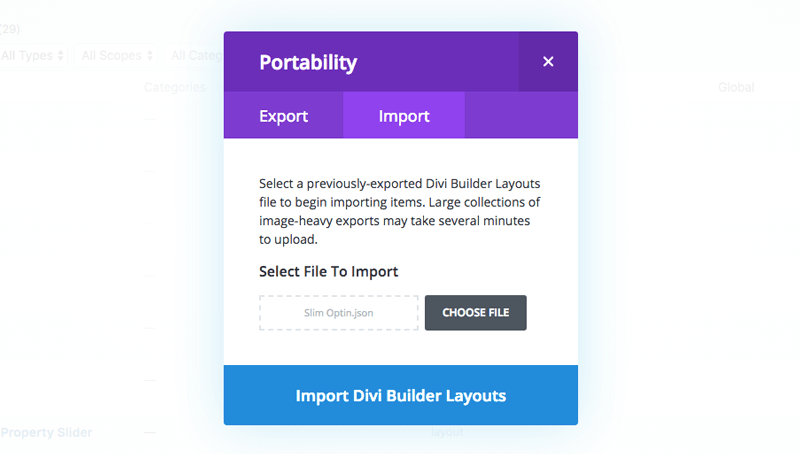
The download package includes a json file that will add three sections to your Divi Library: Mobile Optin, Tablet Optin, and Desktop Optin. Each one is displayed respectively on different devices depending on screen resolution. Go to Divi → Divi Library and click the Import/Export button located at the top of the screen. Now select the Import tab, click Choose File, and select the slim_optin.json file that can be found in the download package.
Add sections to the page
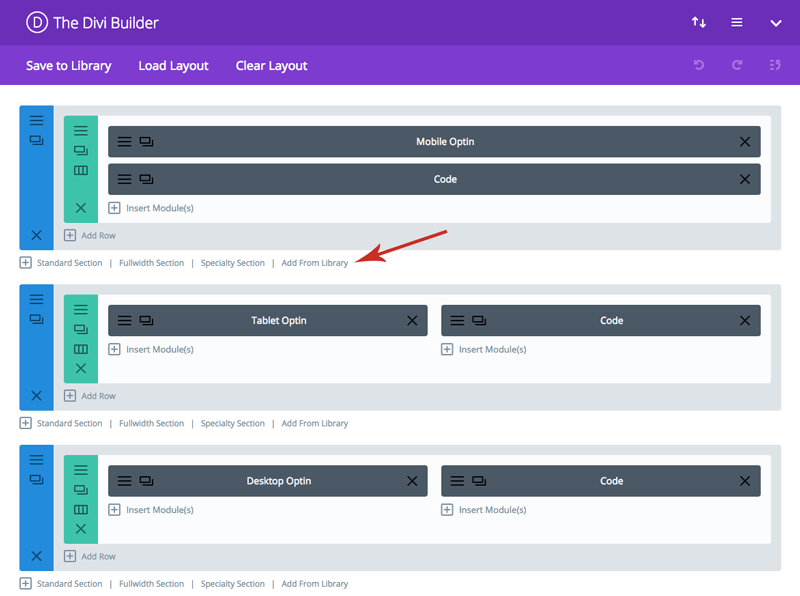
Our email optin is ready! In this last step, we just need to add the saved sections to the page where we want our slim email optin section to be displayed. Open the page and click Add From Library. Repeat this step for all 3 sections: Mobile Optin, Tablet Optin, and Desktop Optin.
Note: Make sure that the shortcode for the form in Code module is proper. If you haven’t used Bloom plugin before and haven’t created any opt-in form before, it will work and no changes are required.
Maciej Ekstedt
Maciej is the founder and CEO of B3 Multimedia Solutions. He is a self-made web designer and marketing expert, and he loves his job so much that he barely leaves the office. He transforms creative ideas into effective strategies for his company and for his clients. Maciej is fascinated by the phenomenon of megalopolis. He notices patterns and details which make up the whole thing, and he uses these skills in his work.
Use coupon code SLIDER15 at checkout!







No Screenshot, no demo of the final result?
Hi Johannes,
The screenshot is at the very top of this post 😉
Hi Maciej,
Could you provide a direct link to download the slim_optin.json file please?
I’d be very grateful as I can’t find it on the links that’s been suggested.
Hello Chris,
I’m sorry to hear you are having a problem with downloading the file. You need to use a sign up form. Once email submitted, button with a download link will appear. Please check this video – https://www.dropbox.com/s/wwuxmn7i31zlzgs/slim-optin-download.mov?dl=0
I’m having issues with the email icon. I have 5 random icons in eight before my email field. I’m clueless on how to fix this. Any ideas?
Hi Courtney, can you please provide issue URL? I can take a look at what’s the issue there.
Thanks for answering so quickly! Sadly I can’t provide a URL. However, the only thing I changed so far is the colors. But here’s an image of the icons – https://imgur.com/HOGe3jT
Sorry, but it’s not possible to give you any advice without seeing the website. The code you have added won’t help. There is something that doesn’t work at your end.