How to add a floating bubble icon that opens contact form popup
In this tutorial I would like to show you how to add a floating bubble button that opens a modal popup – it is exactly the same as you see on our website. We use a premium WordPress plugin called – Layered Popups. For this tutorial we will trigger a form using Caldera Forms. This is available for free, and in my opinion, this is the best and the easiest form maker available for WordPress.
For all operations described in this article I would strongly recommend you use a child theme. If you don’t have a child theme in place, please consider creating one. You can find more information about creating child themes on Elegant Themes blog.
Are you ready? Let’s get started!
1. Install Caldera Forms and create a contact form
We will use Caldera Forms for our popup. If you don’t have it yet, install the plugin and activate it.
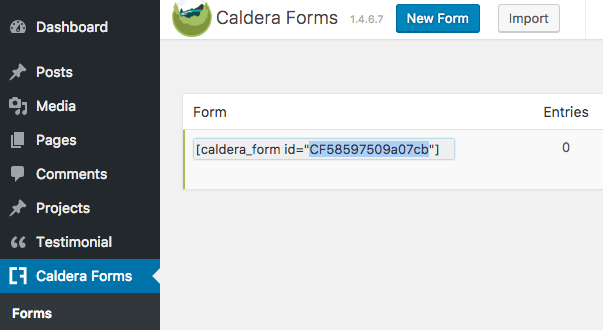
Open the Caldera Form tab located in your WordPress Dashboard and add a new form. You can use a pre-built layout or build your own form from scratch. Once the form is created, copy the form shortcode to your clipboard.
2. Add code to footer.php
Navigate to your child theme folder and open the footer.php file using your favorite text editor (I use use Sublime Text). If you don’t have the footer.php file in your child theme folder, copy it from the parent Divi theme and paste it into your child theme root directory.
Firstly we will add the following code at the very top of your footer.php file or you can add any where:
|
1 |
<div class="sign-up"><a href="#"><span class="et_pb_contact et-pb-icon"></span></a></div> |
Now we need to add another line of code. Search for the following code:
|
1 |
<?php get_sidebar( 'footer' ); ?> |
and paste the code just below it (remember to use your from id):
|
1 |
<div id="popup-booking-form"> <?php echo do_shortcode('[caldera_form_modal type="button" id="CF58597509a07cb" width="600"]'); ?> </div> |
Before we save and close this file we will add one more code snippet. Add the following code before the closing body tag:
|
1 2 3 4 5 6 7 8 9 10 11 12 13 |
<script type="text/javascript"> jQuery(document).ready(function($){ if ( $('.et_pb_contact').length ) { $(window).scroll(function(){ if ($(this).scrollTop() > 800) { $('.et_pb_contact').show().removeClass( 'et-hidden' ).addClass( 'et-visible' ); } else { $('.et_pb_contact').removeClass( 'et-visible' ).addClass( 'et-hidden' ); } }); } }); </script> |
3. Create contact_popup.js file
Here we need to add a custom script that will allow us to trigger the Caldera Form popup after the bubble icon is clicked.
1. Create a js folder in your child theme directory (if you already have one then skip this step),
2. Inside the js folder create a new file called contact_popup.js
3. Add the following code to the newly created contact_popup.js file (remember to use the proper form ID that you created in step 1)
|
1 2 3 4 5 6 7 8 9 10 11 12 13 14 |
jQuery(document).ready(function( $ ) { // This could be generalized with a little effort. var remodalTarget = $('#popup-booking-form button.caldera-forms-modal').data("remodalTarget"); $('.sign-up a').data("form","CF58597509a07cb"); $('.sign-up a').data("remodalTarget", remodalTarget); $('.sign-up a').data("width", 1000); $('.sign-up a').attr({ 'data-form': "CF58597509a07cb", 'data-remodal-target': remodalTarget, 'data-width': 1000 }); $('.sign-up a').attr("href","#"); $('.sign-up a').addClass("caldera-forms-modal"); }); |
4. Enqueue the contact_popup.js in your function.php file
Open the functions.php file located in you child theme root directory and add the following code:
|
1 2 3 4 5 |
// Enqueue Reservation Popup add_action( 'wp_enqueue_scripts', 'contact_popup' ); function contact_popup() { wp_enqueue_script( 'contact_popup', get_stylesheet_directory_uri() . '/js/contact_popup.js', array( 'jquery' ), '', true ); } |
5. Style your button
In this step we will add some css to style your bubble to fit your brand. Add the following code to your style.css file.
|
1 2 3 4 5 6 7 8 9 10 11 12 13 14 15 16 17 18 19 20 21 22 23 24 25 26 27 28 29 30 31 32 33 34 35 36 37 38 39 40 41 42 43 44 45 46 47 48 49 50 51 52 53 54 |
.et_pb_contact.et-pb-icon { background: rgb(44, 148, 242); /* Change Bubble Color */ color: #ffffff; /* Change Icon Color */ right: 26px; bottom: 30px; padding: 12px; -webkit-border-radius: 50px; -moz-border-radius: 50px; border-radius: 50px; font-size: 22px; -webkit-transition: all 400ms ease; -moz-transition: all 400ms ease; -ms-transition: all 400ms ease; -o-transition: all 400ms ease; transition: all 400ms ease; display: none; position: fixed; z-index: 99999; text-align: center; text-decoration: none; cursor: pointer; } .et_pb_contact.et-pb-icon:hover { box-shadow: 1px 4px 5px rgba(0,0,0,0.12); -moz-box-shadow: 1px 4px 5px rgba(0,0,0,0.12); -webkit-box-shadow: 1px 4px 5px rgba(0,0,0,0.12); background: #3B74A9; /* Change Bubble Color on Hover */ -webkit-transition: all 400ms ease; -moz-transition: all 400ms ease; -ms-transition: all 400ms ease; -o-transition: all 400ms ease; transition: all 400ms ease; } .et_pb_contact.et-visible { opacity: 1; -webkit-animation: fadeInRight 1s 1 cubic-bezier(0.77, 0, 0.175, 1); -moz-animation: fadeInRight 1s 1 cubic-bezier(0.77, 0, 0.175, 1); -o-animation: fadeInRight 1s 1 cubic-bezier(0.77, 0, 0.175, 1); animation: fadeInRight 1s 1 cubic-bezier(0.77, 0, 0.175, 1); } .et_pb_contact.et-hidden { opacity: 0; -webkit-animation: fadeOutRight 1s 1 cubic-bezier(0.77, 0, 0.175, 1); -moz-animation: fadeOutRight 1s 1 cubic-bezier(0.77, 0, 0.175, 1); -o-animation: fadeOutRight 1s 1 cubic-bezier(0.77, 0, 0.175, 1); animation: fadeOutRight 1s 1 cubic-bezier(0.77, 0, 0.175, 1); } .et_pb_contact:before{ content: '\76'; /* Change Icon */ } #popup-contact-form { display: none; } |
You can find more icons here.
That’s it. Enjoy! In the next article I will show you how to style the form to make it more professional and elegant. Stay tuned!
Maciej Ekstedt
Creative Director
Get 10% discount with coupon code ESTATE10










Wish there was a demo on this. I’m really thinking about trying this out. Thanks for putting the time into it.
Hi Lukas. Thank you for your comment. We have used the same method on our premium divi child theme. Check this page: https://bruno.b3multimedia.ie/ and click “Send Message” located in main menu.
How to do the same in caldera forms? I mean Pop Up, pop-up when you click on the button CTA?
Hi Max. If you create new page in your wordpress divi site, if you switch to Standard Visual Editor (disable Divi Builder) then you will see Caldera Forms button. After clicking modal popup with options will show up and you will be able to select “Modal Popup” from options. Hopefully this helps 🙂
Fantastic tutorial and something I’m going to try on my Divi site. Just noticed that in Step 3 your js file should be called contact_popup.js rather than contact_form.js so that it matches the code. I’ve got the bubble in place but just need to get the correct form popping up now. Thanks for sharing 🙂
Hi Victoria. I’m glad to hear it was useful and thank you for mentioning. Article fixed 🙂
Dziekuje Macieju! 🙂
This is really nice. 🙂 Instead of the icon would be possible to have a float button “Book now” ?
Hello Dimitris. Thank you for your comment 🙂 It is possible to have a text instead of icon however custom coding would be required.
A combination of your guide and this one? https://www.elegantthemes.com/blog/divi-resources/how-to-add-a-floating-action-button-to-your-site-with-the-divi-code-module
Consider please for a future tutorial 🙂
Thank you Dimitris 🙂 This is definitely great tutorial. We will take a look on this shortly!
Love it. Would this work for a donation window/button? Meaning…folks could give a donation in this window instead of subscribing to a newsletter, e.g.
Hello Jeff,
Thank you for your comment. For this tutorial we use Caldera Forms plugin to trigger this popup. I assume this would be straight forward to add donation code to the popup. Caldera Forms builder offers HTML/Text module so you can easily add custom code and display inside popup. Hopefully this helps 🙂
Hi, Do you have a tutorial on how to make a Popup Contact Form equal to what you use in your Call to Action buttons?
Hi Carlos 🙂 Unfortunately not, there is no tutorial for that however we use the same method as mentioned in this tutorial. We just use different popup plugin that can be found here.
nice, thanks for sharing.
Keep updating.
Awesome article!
I am using a theme that is not Divi, can i get the same effect?
I really need it and your article seems to be the only one close to answering my question.. Please help.
Hello,
I haven’t tried it on another themes but I think it should work the same. Please have a try 🙂
That’s exactly what I was looking for. Thank you.
I am also interested in having a text ‘contact me’ instead of an icon. You said that it might need further coding. will it be complicated to achieve that? If you have any tips/links, I’d be grateful!
Thanks so much,
Great tutorial!
Here’s the result on my website: https://marcapersonal.agency/
Awesome Billy 🙂 I’m glad to hear you like it!
Thanks Maciej Awesome tutorial!
Quick note: I have a little bug while combining this with a traditional Divi contact form Module. Let me show you on a quick video. Any piece of advice will be much appreciated
https://www.loom.com/share/4ae79c58befa4b7bbbba0195b9238300
The fix would be quite simple. I would suggest to add custom class to your form at the bottom of the page, and then target :before element with the class added to that form only, so it won’t hide the icon in the button. So the code would look like the following:
.your_class .et_pb_contact:before {display:none;}
Please check and let me know.