Girly Documentation
This version of Girly is fully compatible with versions 3.1+. Some features or elements may not be compatible with previous versions. Please ensure that you’ve downloaded the latest version of Divi.
Please note:
Ensure you have the Divi Theme installed and activated prior to installing the Girly Child Theme.
To avoid any issues during installation it is highly recommended that you use this child theme on a fresh installation of WordPress.
PREPARATION
INSTALLING CHILD THEME
IMPORTING DEMO CONTENT
THEME OPTIONS
THEME CUSTOMIZATION
F.A.Q.
SUPPORT
CHANGELOG
Step 1: Download child theme files
After purchase, download the files from your account section or click the download link in your purchase confirmation email.
Step 2: Unzip Files
Unzip the Unzip_This_First_Girly.zip file to your computer, it contains the following files:
• Girly.zip – the installable Girly child theme file
And in Import Files folder:
• girly-demo-content.xml – the Girly theme demo content
• girly-customizer.dat – the Girly theme customizer settings
• girly-widgets.wie – the Girly widgets settings
• girly-monarch-settings-json – the Monarch plugin settings import file
• girly-library-items.json – a backup of all Girly Library elements
• girly-customizer-backup.json – the Girly theme customizer backup file (when you’d like to use default import option)
Step 1: Install Divi Theme (if not installed yet)
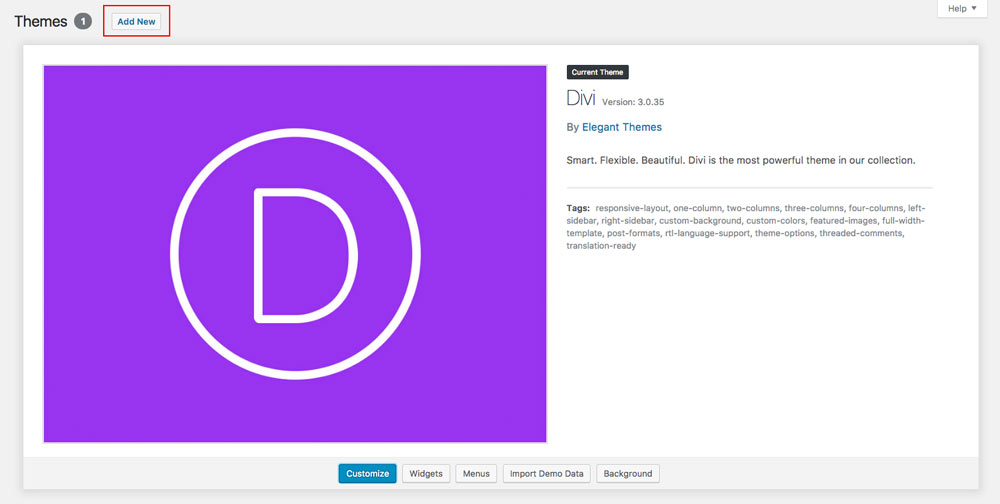
Once you’ve downloaded the Divi theme package, login to your WordPress website and go to Appearance > Themes. Find and upload the Divi parent theme. Next click on the Add New Theme
Step 2: Install and activate Girly
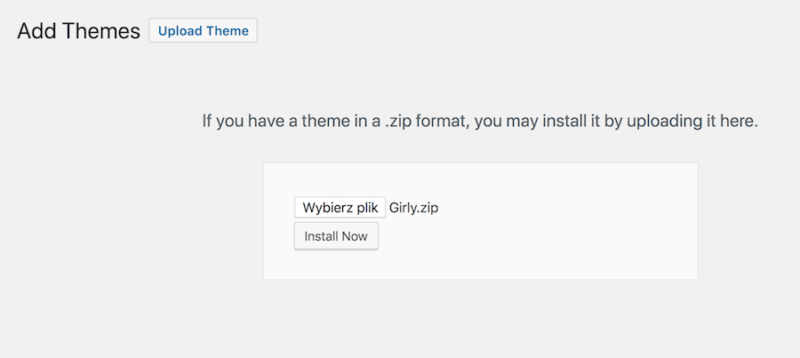
Click on Upload Theme and then Choose file.

In the downloaded package find and select Girly.zip file, then click on the Install Now button.
Completing the upload, you will need to activate the theme by clicking on the Activate button.
Step 3: Activate your product
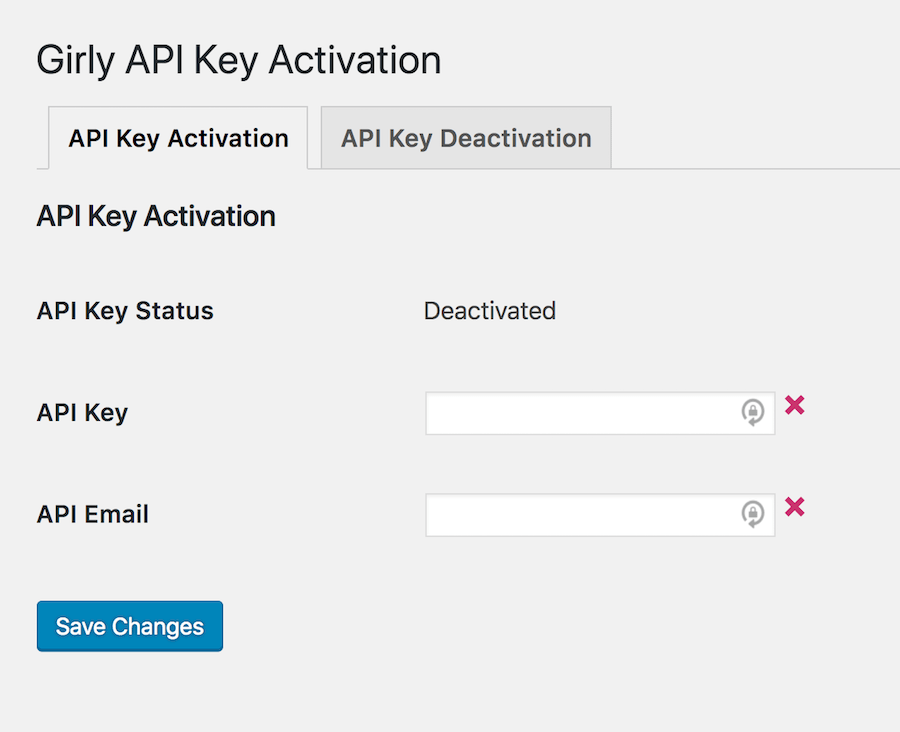
To activate your product and get updates please go to Divi > Girly Activation and enter your API Key and API Email.
To see your API Keys please login to your account.

Step 4: Plugin activation
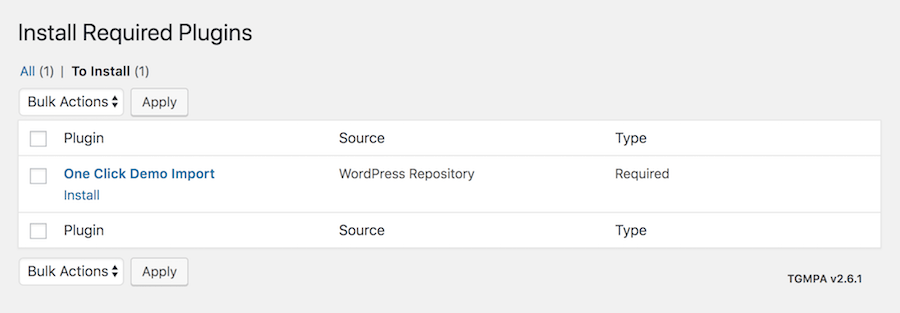
Girly requires only one plugin: One-Click Demo Import. We have made installing process very simple. After Girly child theme is activated system will ask you to install all missed plugin. Click Begin installing plugins.

Next, choose Install link. This will install and activate the One Click feature to import all the demo content and settings and the Divi Widget Builder Plugin.
Step 5: Permalinks setup
Go to Settings > Permalinks, select “Post name” and click Save Changes.

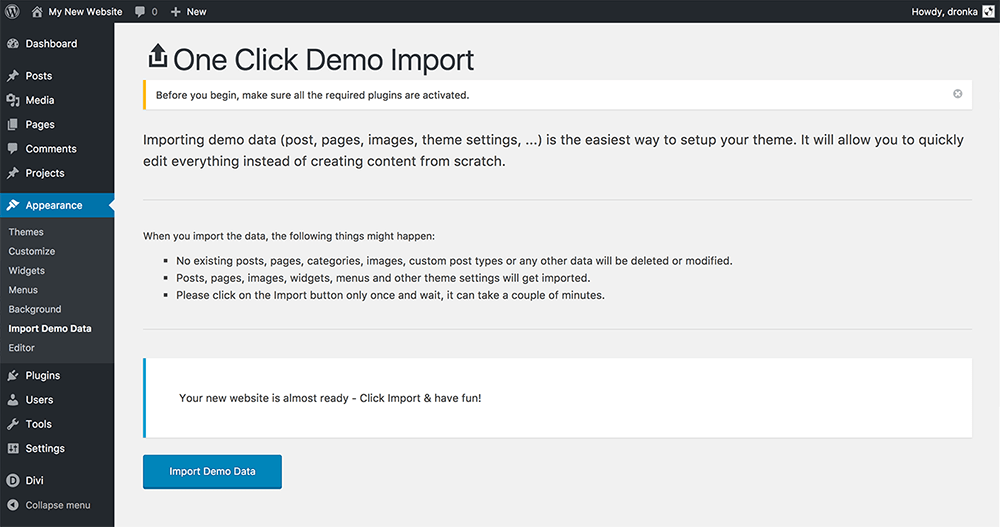
Go to Appearance > Import Data Demo, and click on the Import Demo Data button.
Note: This may take even several minutes, depending on internet connection speed. Please be patient.

Optional: Import Monarch settings
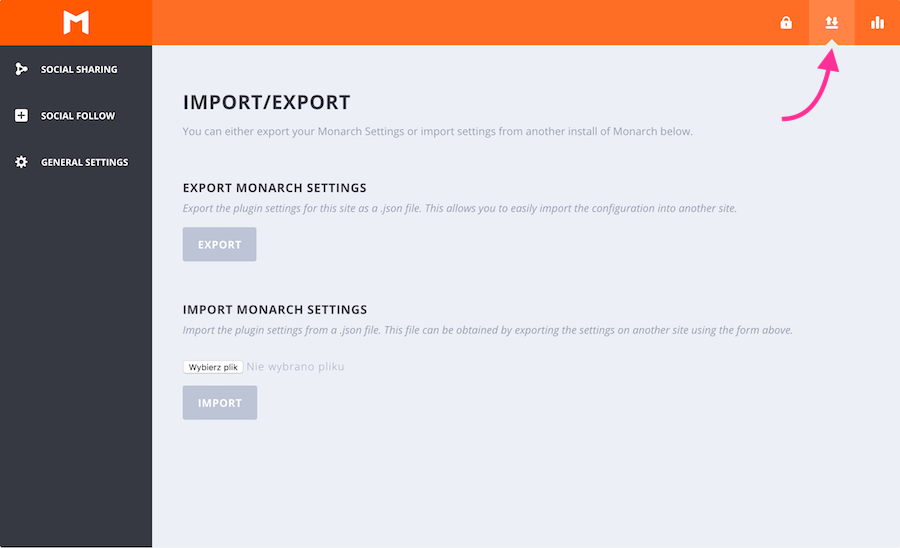
If you want to use Monarch plugin for social sharing you can import Girly demo Monarch settings. After installing Monarch plugin navigate to Tools -> Monarch Settings. Click on the upper-right Import icon and choose the girly-monarch-settings.json file from the Girly Import Files folder and click IMPORT.
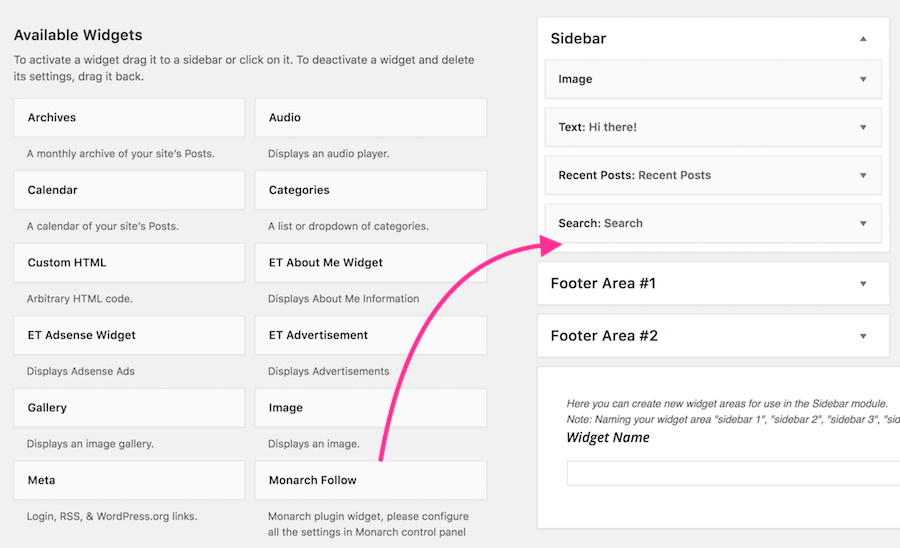
Next, you can navigate to Appearance -> Widgets in order to place Monarch Follow widget in the Sidebar of your blog pages.
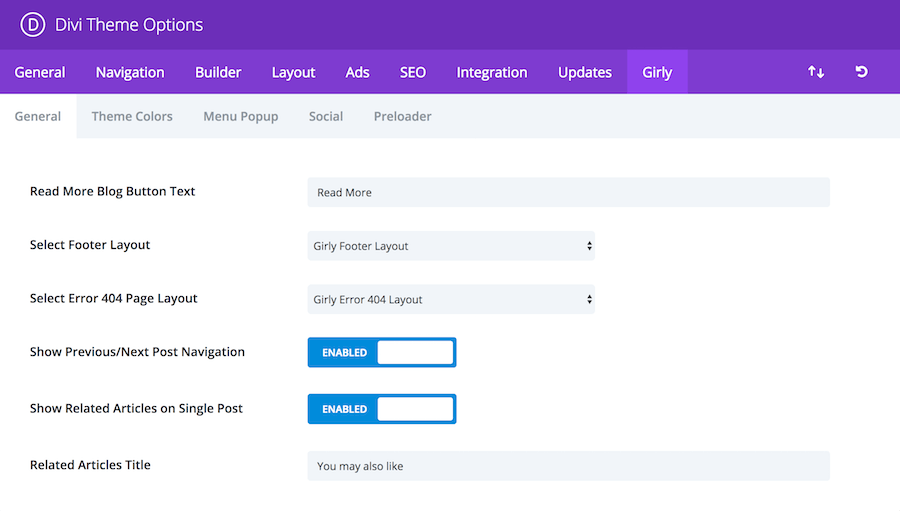
General Tab
Available settings:
Read More Blog Button Text – changes the default text on all Divi Blog Modules.
Select Footer Layout – you can choose any layout saved in the Divi Library and display it as your global footer, just before the standard Divi footer.
Select Error 404 Page Layout – you can choose any layout saved in the Divi Library and display it on “no results” error 404 page.
Show Previous/Next Post Navigation – Show additinal navigation links below blog post content – Enabled / Disabled
Show Related Articles on Single Post – Show 3 random blog posts (from the same category) on single post page, at the end of post content – Enabled/Disabled
Related Articles Title – choose your title for the Related Posts section
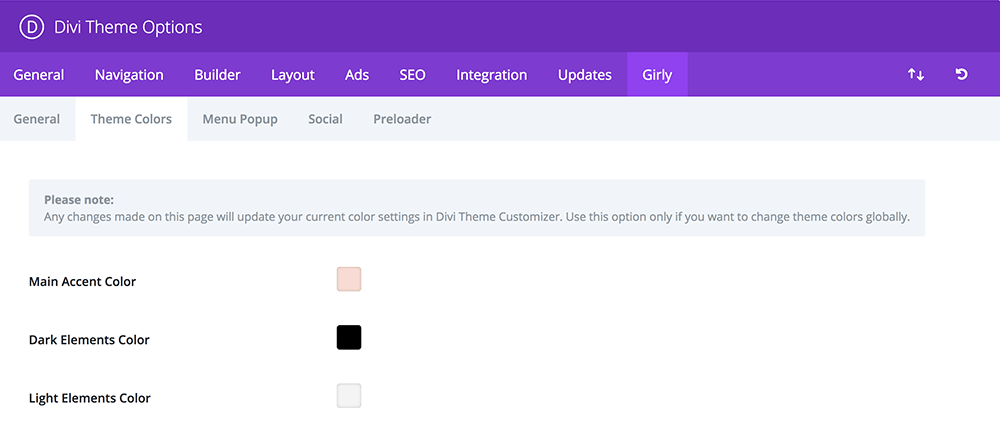
Theme Colors
Here you can edit all your website colors at once. Please note: any changes made on this page will update your current color settings in Divi Theme Customizer. Use this option only if you want to change theme colors globally.
Menu Popup
Available settings:
Trigger Popup – Enabled/Disabled.
Select Library Item – choose any layout saved in the Divi Library and display it inside the Popup.
You can change Popup background and close button colors in Theme Customizer. It can be triggered from the menu, by a button – or through any link on the site. All you need to do is to set the link’s href attribute to #open-popup

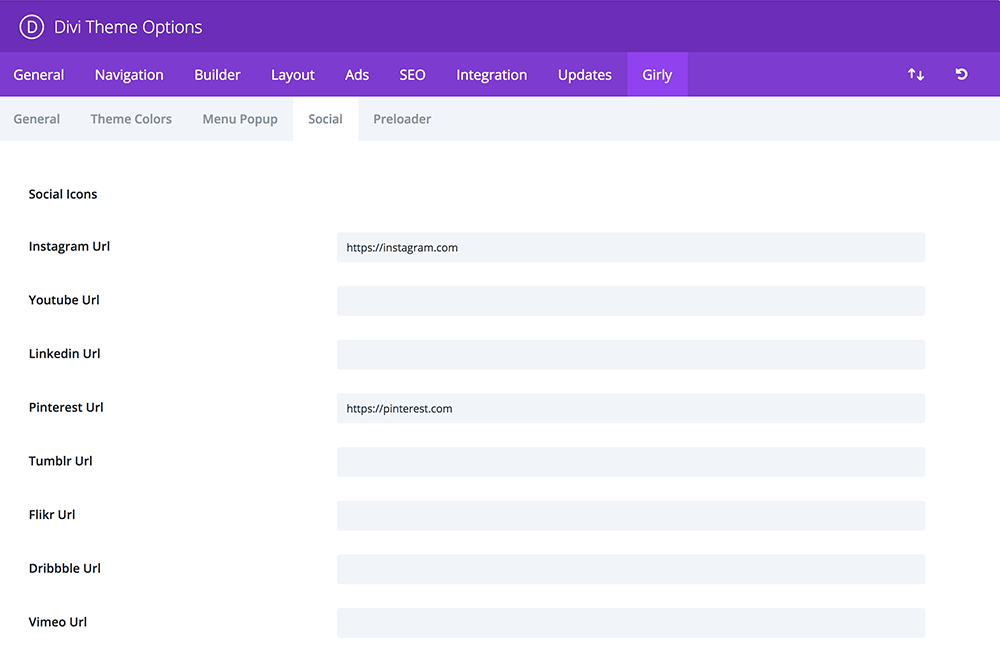
Social
This option allows you to add more Social Profiles to the default Divi Social icons/links, which can be displayed in the header or the bottom footer.
Preloader
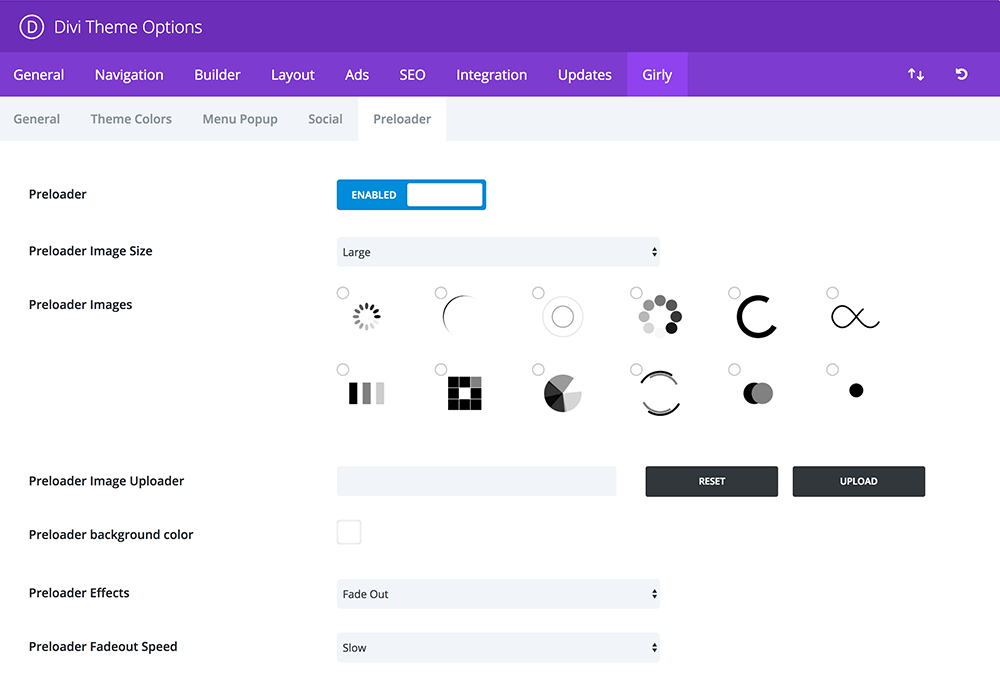
Available options:
Preloader – Disabled/Enabled
Preloader Image Size – Regular / Large
Preloader Images – select preloader image
Preloader Image Uploader – you can upload your own preloader/gif image
Preloader background color – define background color for preloader
Preloader Effects – define effect FadeOut/SlideUp
Preloader Fadeout Speed – define speed of preloader fadeout effect
Theme Customizer settings
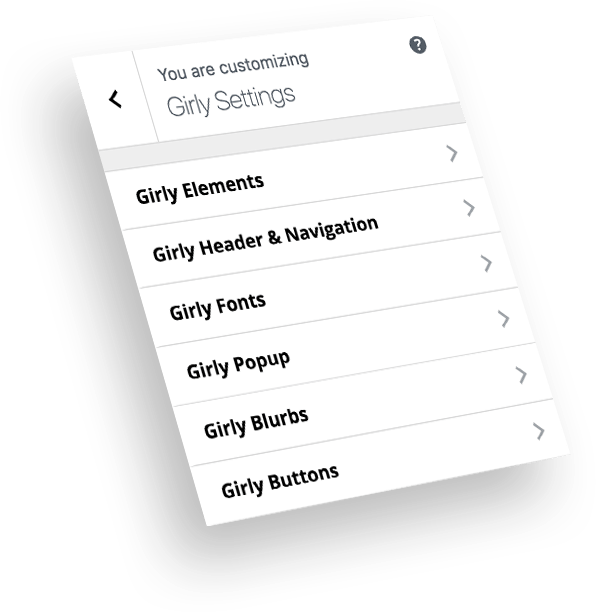 Navigate to Divi -> Theme Customizer where you’ll find the Girly Settings tab. Inside this tab you’ll find following sections:
Girly Elements – You can set light, dark and accent colors for various miscellaneous elements as well as choose between gold, silver or rose gold pattern for highlighs or disable the glam effect and use a solid color instead.
Girly Header & Navigation – You can choose wheter to show or hide top bar with secondary navigation on scroll (when fixed navigation is enabled) and you can change colors of the navigation elements and Call To Action menu button.
Girly Fonts – You can choose additional font that is used globally for main decorative headers. Font will be used on all headers that are inside any module with a custom CSS class of girly-heading. By default Divi doesn’t provide a global options for setting font-weights. With Girly you can set global font-weights separately for navigation elements, body text, headers and buttons.
Girly Popup – Change the colors of the background overlay and close popup button.
Girly Blurbs – Customize the appearance of 4 different pre-styled Blurb modules
Girly Buttons – With Girly you can use two additional button styles – Secondary Button (using custom CSS class of girly-sec-button) and Call To Action Button (using custom CSS class of girly-cta-button). You can set colors of these buttons globally and then just use CSS class whenever you need them.
Page Templates
Alongside with two Page Templates that come with Divi (Default Template and “Blank Page”) for each page you create with Girly you can use one of two additional Page Templates:
“Transparent Header” – use this template when you want to place content (background) underneath the top menu. Remeber about setting proper padding for the first section while using this layout, so your page elements aren’t covered by the navigation. When you’re editing this layout using Divi Visual Builder switch to Wireframe View to access first section/row/module settings.
“Transparent Header & No Global Footer” – this template works the same way as the first one, and additionally will not display Girly default footer (Divi footer is still visible).
CSS Edits
If you are going to add your own custom edits – please place all your CSS code inside Theme Customizer’s Custom CSS tab or in Divi Theme Options, as all the changes made within child theme files will be lost with the automatic update. If you wish to edit or add any files in the child theme folder please do not use the automatic update feature.
How to enable Call To Action menu item?
Naviagate to Appearance -> Menus. Click on the Screen Options button at the top right of the page and make sure the “CSS Classes” option is selected. Now you can see a CSS class for each menu item. Add a class of menu-cta to your Call To Action menu element.
What additional CSS classes can be used?
Girly has a couple of very usefull CSS classes, which you can use:
- vertical-align – add this class to any column in order to vertically align the modules inside that column. Make sure you also select “Equalize column heighs” option for that row.
- reverse-columns-mobile – use this class on a row if you want to reverse the order of columns (display right column before the left) on tablet and phones.
- center-text-mobile – use this class on a Text Module to center-align text on tablet and phones.
Elegant Themes
For additional assistance with using the Divi theme framework, Elegant Themes offers free technical support to all their members. Log in to your account at Elegant Themes website.
Divi Communities
You can also find support on Facebook or Google+ by posting your questions in the community group:
Divi Theme | Extra Theme | Help & Share
Google+ Divi Community
Support
For additional questions or support please log in to your Customer Account to submit a support ticket.
2021 August 20th – Version 1.8
– Fixed: Compatibility problems with Divi 4.10
– New: option to disable global Girly footer
– API code updated
– Tested with WP 5.8 and Divi 4.10.2
2021 January 14th – Version 1.7
– Fixed: Compatibility problems with Divi 4.8
– API code updated
– Tested with WP 5.6 and Divi 4.8
2020 December 11th – Version 1.6
– Fixed: Compatibility problems with WordPress 5.6 ad jQuery 3.5
– Fixed: Popup not displaying properly if Theme Builder Footer enabled
– Tweak: Archive customizations will not apply if Theme Builder Body Template is assigned
– Tweak: Child Theme Footer Layout won’t display if Theme Builder Footer Layout assigned
– API code updated
– Tested with WP 5.6 and Divi 4.7.5
2020 February 4th – Version 1.5
– Fixed: Testimonials portrait icon duplicated
– Fixed: SVG dividers not visible in the Visual Builder
– Fixed: Blog module not displaying correctly in the Visual Builder
– API code updated
– Tested with WP 5.3.2 and Divi 4.2.2
2019 May 29th – Version 1.4
– Divi template hooks added to single post template
– Fixed: last menu item border missing when CTA link disabled
– Fixed: Icons misplaced on the author archives page
– Fixed: issue with Slim Optin form in Firefox
– Fixed: Related Posts title not displaying properly when “Transparent Header” post template selected
– API code updated
– Tested with WP 5.2.1 and Divi 3.23.3
2019 January 4th – Version 1.3
– Fixed an issue with Visual Builder not loading with Divi 3.19.3
– Fixed issue with custom layouts reverting back to defaults in Theme Options
– Tested with WP 5.0.2 and Divi 3.19.3
2018 December 12th – Version 1.2
– Fixed an issue with Visual Builder not loading in WP 5.0
– Tested with WP 5.0 and Divi 3.18.4
– Slim Optin Form styling update for Divi 3.4
– Fixed scrolling bug on Safari when testimonial modules are used
– Tested with WordPress 4.9.6 and Divi 3.5.1
– Release date
